Skip to Main Content

Formatting Theses & Dissertations using Word 2010: Numbering

Page Contents

Learn about making subsections and appendices easier to number

  • Customizing Your Numbers (different numbers in different places on the page on different pages)
  • Automatic Chapter and Subsection Numbering
  • Outline Numbering in Appendices

Customizing Your Numbering

Add different page numbers or number formats to different sections

Let's say you want to use different page numbers or number formats and styles in different parts of your document. You could use page numbers such as i, ii, iii… for the introduction and table of contents and 1, 2, 3… for everything after. The trick is to divide the document into sections and to make sure those sections aren’t linked. Then, set the page numbering for each of those sections by following these steps.

Notes: 

  • If you're using Word Online, you can add page breaks but not section breaks. If you have the Word desktop application, use the Open in Word command to open the document. When you’re done and you save the document, it will continue to be stored where you opened it in Word Online. If you don’t have Word, you can try or buy it in the latest version of Office now.

  •  

  1. Click at the very beginning of the first page where you want to start, stop, or change page numbering.

  2. Choose Layout (or Page Layout) > Breaks > Next Page.

    The break options are shown on the Layout tab.

    Tip: You might find it helpful to see section breaks and other formatting marks as you type. On the Hometab, in the Paragraph group, choose Show/Hide (¶) to turn on the display of formatting marks. Choose the button again to turn off the display.

  3. On the page after the section break, double-click in the header (top of page) or footer (bottom of page) area where you want to display page numbers. This will open the Design tab under Header & Footer Tools.

  4. Click Link to Previous to deselect the button and disconnect your header or footer from the header or footer in the previous section.

    The Link to Previous option is highlighted in Header & Footer Tools.

    Note: If Link to Previous is dimmed, it means there is no section break between the page you're on and the previous page. Make sure you've successfully added a section break (see step 2) and that you've opened the header for the appropriate section.

  5. In the Header & Footer group, click Page Number, pick a location, and then choose a style in the gallery.

    In the Header and Footer group, choose Page Number, and then choose Current Position.

    Note: If your change only affects the first page of your section, make sure Different First Page is not selected. Double-click the header or footer area of the first page of the section, and look in the Optionsgroup on the Design tab.

  6. To choose a format or to control the starting number, in the Header & Footer group, choose Page Number > Format Page Numbers to open the Page Number Format dialog box.
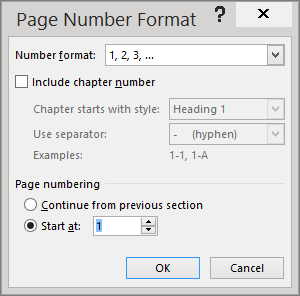
    The options in the Page Number Format dialog box are shown.

  7. Do either or both of the following:

    • Click Number format to select the format for the numbering, such as a, b, c or i, ii, iii.

    • Under Page numbering, choose Start at and type a number that you want to start the section with.

    Tips: 

    • If you just want to change or delete the first page number of a section, double-click to open the header or footer on that page, and in the Options group on the Design tab, click Different First Page. Then delete or format the first page number as you like.

    • You also can change the appearance of the page numbers. On the Home tab, choose Font, and change, for example, the font style and family, and font size and color.

  8. When you’re done, choose the Close Header and Footer, or double-click anywhere outside the header or footer area to close it.

    The Close Header and Footer option is highlighted on the Header and Footer Tools tab. .

Format Page Number in Word 2010 and 2007.

To Format the page numbering for different sections, follow these steps.
 

  1. Click between two parts of your document that you want to number differently.
  2. on the Page Layout Tab, Click Breaks.
  3. Click Next PageEven Page, or Odd Page, and then click OK.
  4. Click in the first section of your document.
  5. On the Insert Tab Click Header and then Click Edit Header
  6. Click in the header or footer where you want the page number
  7. On the Header & Footer Tools tab Click Page Number
  8. Click The option that puts the page number where you would like
  9. On the Header & Footer Tolls tab Click Page Number
  10. Click Format Page numbers
  11. In the Number Format box, click the format that you want for the numbers in this section.
  12. Do one of the following:
    • If you want the page numbering for the first page in this section to start at a particular number other than the first number in the format series, click Start at under Page numbering, and then enter the first number that you want to appear on the first page of the section.
    • If you want the page numbering to continue from the previous section, click Continue from previous section.
  13. Click OK
  14. On the Header and Footer tools tab, click Next in the Navigation Group
  15. Repeat steps 1 through 3 and 9 through 11 to change the page numbering for another section
  16. On the Header and Footer tools tab, click Close

Automatic Chapter and Subsection Numbering

Important Note: Not everyone needs this type of numbering; if your discipline doesn’t require it, skip this section!

Word can automatically number sections (Chapter 1, 1.1, 1.2, etc.) of your document and include the chapter number in the captions (Figure 1.2, 2.2, etc.).

  1. Make sure each of your chapter titles are in the Heading 1 style, and then click on one of your chapter titles.
  2. If you just need the chapter number included in captions, on the On the Home Ribbon, in the Paragraph Group, click the Multilevel List icon and select the one with the words Chapter 1 in it from the List Library section. 

    If you need subsections numbered (for example, 2.1, 2.2, 2.12, etc.) as well, then choose the list the 1 Heading 1; 1.1 Heading 2, etc. option (right side, middle row). Note that doing this once sets the formatting for all heading levels.
  3. Click OK when you are finished.
  4. If you typed in the text “Chapter #”, and now it is duplicating your efforts, delete the text you typed and leave the automatically generated chapter number.
  5. To follow the automatically generated chapter number with the title of your chapter on a new line, click just before the text of your title, hold down the Shift key on the keyboard, and then press the Enter key.

Note: If you have any problems with word automatically adding outline numbering to parts of your front matter, simply delete it.  Your chapter numbers will reset to show the correct number of chapters.

Start Numbering on Page 2

How do I start page numbers on the second page of my Word 2010 document?

Word 2010, by default, starts page numbers on the first page of a document. If the first page is a cover page, or a title page, then the second page of the document should be page 1.


Word page numbering screen shot

  • Insert page numbers by clicking on the Insert tab and choosing Page Number in the Header & Footer tab. Then select the position of the numbering.
  • Because the new page numbers will be selected, the Design tab for Header & Footer Tools will appear. Under Options, select Different First Page. (This will start page numbering page 2, but the second page will be labeled "2". This isn't what we wanted. There is an extra step to making this page say "1".)
  • While the Design tab for Header & Footer is still up, select Page Number in the Header & Footer group. Then choose Format Page Number.
  • The resulting window is shown to the right. Change the radial button at the bottom to Start at and type in 0. Then click ok.


Follow the instructions at this link for roman numerals.

This was taken from the Just Tips webpage from the website for Mission Critical Training in Denver.

Customizing Your Numbers

If you want to change anything about the numbers – for example, you are using the 1.1, 1.2, etc. style but would like the word “Chapter” to display automatically in front of the Heading 1 number, you want to change Arabic numbers to Ordinal, or you want to change the spacing after the numbers, you can.

Click one of your headings, then go back to the Home Ribbon, and in the Paragraph Group click the Multilevel List icon (see screen shot above) and select Define New Multilevel List….  Click the More>> button, then select the relevant list level.

  • You can use the Number style for this level: pulldown menu to choose from a various styles, as seen in the screenshot (below the Enter formatting for number: box).
  • In the screenshot, with the Level on the left set at 1, we added the word “Chapter”. Moving to the second level, you can change the period in between the level and sublevel to a dash or anything you want in the Number format box.
  • You can also see that a tab follows the number – you can change it to a space or none. You may have to adjust this if the alignment seems off.

Outline Numbering in Appendices

You may also restart number for captions in your appendices or other separate areas of your dissertation.  You will need to change your outline numbering settings before inserting your captions.

We are going to do a variant of the steps above, but instead of defining new levels for your list, you will be editing the first level from this point forward. This should work, but sometimes Word acts up, and even though you’ve followed all the steps, it doesn’t take. If that happens, set up an appointment with the KNC and we’ll help you out.

  1. Apply the Heading 1 style to the title of your Appendix.
  2. On the Home Ribbon, go to the Paragraph Group, click the Multilevel List icon and select Define New Multilevel List….  Make sure the whole dialog box is showing by clicking on the More>> button (if it says <<Less instead, you are all set).
  3. Under Enter formatting for new number:, replace “Chapter” with “Appendix.”
  4. Choose the appropriate style, (such as A,B,C,…) from the Number style for this level: pulldown menu.
  5. Set the correct letter or number in the Start at: pulldown.
  6. In the Apply changes to: pulldown, choose This point forward.
  7. Click OK to close the dialog box.